Most commercial tenant improvements in Vancouver require a permit, and the fastest way to find out where yours stands is to check your building against the City of Vancouver’s Tenant Improvement Program (TIPs) eligibility list before you touch a wall. If your space qualifies, TIPs can get simple office fit‑outs approved in roughly two to three weeks. If it doesn’t, you’re looking at the standard building permit stream, which typically runs two to four months depending on scope and City Hall’s current workload.
Here’s what to do in the next hour, not the next week:
- Check TIPs eligibility first. Confirm your building type and project scope against the City’s TIPs list before assuming you need the full standard process.
- Assemble your baseline documents. Lease agreement, floor plan, and a written scope of work are the minimum you need before calling anyone.
- Call Van311 or the Commercial Renovation Centre (CRC). A five‑minute conversation with the City’s front‑line staff can save you weeks of guesswork.
Skip the permit step entirely and you risk a stop‑work order mid‑build, fines, and an occupancy delay that pushes back your opening date, and possibly your lease’s rent‑free period.
Key Takeaways
Getting a tenant improvement permit approved quickly in Vancouver depends on confirming your TIPs eligibility and submitting a complete, coordinated drawing package on the first attempt.
| Point | Details |
|---|---|
| Confirm TIPs eligibility first | Check your building against the City’s TIPs list before assuming your timeline. |
| Assemble a complete package | Include architectural, mechanical, electrical, and life‑safety drawings plus consultant letters. |
| Call Van311 or the CRC early | A quick call confirms permit status before you sign a lease or contract. |
| Budget for fees and contingency | Confirm current City fee schedule rates and add a contingency to your construction budget. |
| Engage a licensed contractor for complex scope | Multigroup Contracting coordinates drawings, consultants, and inspections for Metro Vancouver tenant improvements. |
Table of Contents
- Do I need a tenant improvement permit in Vancouver?
- What is the City of Vancouver Tenant Improvement Program (TIPs)?
- Which tenant improvements trigger a building permit?
- TIPs versus the standard building permit: which stream applies to you?
- How do I apply for a tenant improvement permit in Vancouver?
- Which forms and checklists does the City require?
- How much does a tenant improvement permit cost in Vancouver?
- How long does a Vancouver tenant improvement permit take?
- What causes permits to get rejected or delayed?
- When do you need an architect, engineer, or licensed contractor?
- How Multigroup Contracting streamlines the permit process
- Get help with your tenant improvement permit in Metro Vancouver
- Sources
- FAQ
Do I need a tenant improvement permit in Vancouver?
The answer depends less on how big your renovation feels and more on what it physically touches. Cosmetic upgrades, paint, new flooring, swapping out fixtures, generally don’t trigger a permit. The moment your project touches a wall, a plumbing line, an electrical circuit, gas piping, or the HVAC system, you’re in permit territory under the Vancouver Building Bylaw.
That’s the standard industry term worth knowing here: a tenant improvement permit is simply a building permit issued for work inside a leased commercial space, as opposed to new construction. The City doesn’t use a separate legal category called a “TI permit.” It’s a building permit, evaluated under the same BC Building Code requirements as any other project, just scoped to your unit.
Where things get faster is TIPs, and understanding that program is the real key to a quick approval.
What is the City of Vancouver Tenant Improvement Program (TIPs)?
TIPs is a streamlined review pathway the City created specifically for interior fit‑outs in eligible commercial buildings, most commonly office space. Instead of routing your application through the full development and building permit review used for new construction or major additions, TIPs buildings get an expedited field review with no development permit required at all, according to the City of Vancouver.
That distinction matters for timing. A straightforward office fit‑out in a TIPs‑eligible building can often see permit issuance in two to three weeks, while the same scope of work in a non‑eligible building competes for review time on the standard track, where turnaround commonly stretches to two to four months.
TIPs generally suits:
- Office tenant improvements in pre‑approved, eligible buildings on the City’s TIPs list.
- Projects that don’t add floor area or change the building’s occupancy classification.
- Work that stays within the existing structural and life‑safety envelope of the space.
TIPs generally does not suit retail buildouts, restaurant and coffee shop renovations involving new grease traps or exhaust systems, industrial and warehouse conversions, or older buildings outside the program’s approved list. If you manage a franchise retail space or a restaurant concept, assume you’re on the standard track unless a call to the City confirms otherwise. The eligibility list itself is published alongside the TIPs program page, and it’s worth checking before you finalize a design or a lease commencement date with your landlord.
Which tenant improvements trigger a building permit?
If you’re staring at a scope of work and trying to decide whether it needs a permit, run it against this list first.
- Structural changes: removing, relocating, or adding interior walls, especially load‑bearing ones.
- Plumbing work: new fixtures, relocated drains, or added washrooms.
- Electrical work: new circuits, panel upgrades, or relocated outlets and lighting.
- Gas fitting: any new or modified gas line, common in restaurant kitchen buildouts.
- HVAC changes: new rooftop units, ductwork modifications, or altered ventilation for a restaurant hood system.
- Change of occupancy: converting a retail unit to a restaurant, or office space to a medical clinic, changes the building’s use classification and almost always requires a permit review.
- Fire and life safety systems: adding or relocating sprinkler heads, fire alarm devices, or exit signage.
- Increased occupant load: more seating, more workstations, or a layout that pushes past the space’s original design capacity.
Cosmetic work tends to be the exception. Repainting, replacing carpet or vinyl flooring, and installing new millwork that doesn’t touch plumbing or electrical typically fall outside permit requirements. That said, project managers who’ve run dozens of Vancouver TI projects consistently recommend confirming with the City before assuming any scope is exempt, because the line between “cosmetic” and “life safety” can shift depending on your occupancy type and building age.
Pro Tip: Call Van311 before you sign a construction contract, not after. A ten‑minute call confirming your project’s permit status costs nothing. A stop‑work order mid‑build costs you weeks and often thousands in remobilization fees.
TIPs versus the standard building permit: which stream applies to you?
Once you know your project touches something permit‑triggering, the next question is which review stream you land in. The differences aren’t cosmetic. They affect your documentation burden, your timeline, and how much consultant involvement you’ll need up front.
| Factor | TIPs (expedited) | Standard building permit |
|---|---|---|
| Eligibility / scope | Interior office fit‑outs in pre‑approved eligible buildings, no added floor area or occupancy change | Retail, restaurant, industrial, medical, and any project in a non‑eligible or older building |
| Typical turnaround | A short timeframe for straightforward fit‑outs | Roughly two to four months, depending on complexity and queue volume |
| Required documentation | Reduced drawing set, no development permit | Full architectural, mechanical, electrical, and life‑safety drawing package |
| Fee approach | Based on the City’s standard building permit fee schedule, applied to a smaller review scope | Same fee schedule, calculated against full project value and floor area |
| Consultant involvement | Often manageable with a designer and a licensed contractor | Frequently requires an architect, structural engineer, and mechanical/electrical consultants |
| Rejection risk | Lower, given the narrower scope and pre‑vetted building list | Higher, particularly when drawings are incomplete or occupancy classification is unclear |
To figure out which path you’re on, start by checking your building’s age and status against the City’s TIPs list, then look honestly at your scope of work. If your renovation adds a single wall and swaps a light fixture in an eligible office building, you’re likely fast‑tracked. If you’re converting a shell retail unit into a full‑service restaurant, plan for the standard timeline and budget your lease negotiations accordingly.
How do I apply for a tenant improvement permit in Vancouver?
The process follows a fairly predictable sequence, whether you land in TIPs or the standard stream. Missing a step early tends to cost more time than doing it right the first time.
- Confirm zoning and permitted use. Verify your unit’s zoning allows your intended business type before you invest in design.
- Check TIPs eligibility. Cross‑reference your building against the City’s current TIPs list.
- Assemble permit‑ready drawings. This includes architectural plans, mechanical and electrical layouts, and life‑safety drawings where applicable.
- Gather consultant letters. Structural, mechanical, or fire‑safety consultants may need to provide signed letters of assurance depending on scope.
- Complete the application forms. Use the City’s official building and renovating forms and checklists.
- Submit through Van311 or the City’s online portal, along with your required fee payment.
- Respond to review comments. Expect at least one round of clarification requests unless your package is unusually complete.
- Book your field review or inspections once the permit is issued.
- Request permission to occupy once final inspections pass.
Your document checklist should include:
- Permit‑ready architectural drawings showing existing and proposed layouts.
- Mechanical and electrical plans reflecting any HVAC, plumbing, or wiring changes.
- Life‑safety plans covering exits, fire separations, and alarm or sprinkler coverage.
- Signed consultant letters where structural or life‑safety work is involved.
- Specifications and finish schedules for materials affecting fire rating or accessibility.
After submission, your application goes through intake review, then a technical review cycle where City staff flag missing information or code conflicts. Common comments involve unclear occupancy classifications, missing accessibility details, or incomplete mechanical drawings. Once those are resolved, you’ll get field review scheduling, followed by trade permits for electrical, plumbing, and gas work, each inspected on its own sequence before final permit closeout.
Pro Tip: Submit a complete package the first time. Every round of resubmission adds review queue time and, in many cases, a revision fee on top of your original permit cost. A detailed permitting checklist built specifically for Vancouver submissions can help you catch gaps before the City does.
Which forms and checklists does the City require?
The City of Vancouver publishes its application forms, TIPs checklists, and trade permit checklists in one central location, and using them as a pre‑submission gatekeeper is the single easiest way to avoid an intake rejection. Before you submit anything, complete the development/building permit application form, the TIPs checklist if your building qualifies, and any trade‑specific checklists tied to electrical, plumbing, or gas work.
Owner or agent authorization forms matter more than most applicants expect. If you’re a tenant rather than the property owner, the City typically requires a signed authorization from the landlord confirming you’re permitted to apply for permits on the space. Consultant declarations, where required, need to match the scope described in your drawings exactly. A mismatch between what your consultant signed off on and what your drawings show is one of the more common, and entirely avoidable, causes of delay.
All of these forms live on the City’s building and renovating forms, checklists, and bulletins page, and the Commercial Tenant Resource Guide walks through obligations specific to commercial tenants, including where to find support through the Commercial Renovation Centre. Submission happens through Van311 or the City’s online permitting portal, and having your forms pre‑filled before you start that process shaves real time off intake.
How much does a tenant improvement permit cost in Vancouver?
The City calculates building permit fees primarily by use and floor area, applying rates per 100 square metres up to certain thresholds, with maximum fee caps built into the schedule, according to the City’s development and building permit fee schedule. Revisions and minor amendments after issuance carry their own separate fees, which is part of why a complete first submission saves money as well as time.
| Fee category | How it’s calculated | Notes |
|---|---|---|
| Base building permit fee | Per 100 m² of floor area affected, up to schedule maximums | Applies to most non‑residential (“other uses”) tenant improvements |
| TIPs application fee | Same fee schedule, applied against a narrower review scope | Generally lower total review burden due to expedited process |
| Revision fee | Flat or scaled fee per resubmission | Charged when drawings change materially after initial submission |
| Minor amendment fee | Fixed fee per amendment | Applies to small post‑issuance changes |
| Trade permit fees | Separate fees for electrical, plumbing, and gas permits | Charged in addition to the base building permit |
These figures come directly from the City’s published schedule, but fee tables get updated periodically. Confirm current rates with Van311 or the City’s permits office before finalizing your project budget.
Beyond permit fees, most Vancouver tenant improvement projects budget across a few consistent cost buckets. Design consultants (architect, mechanical, electrical) commonly run in the range of a few thousand to tens of thousands of dollars depending on project complexity. Construction costs for a typical office or retail TI in Metro Vancouver often land somewhere between $80 and $200 per square foot, though restaurant buildouts with kitchen equipment and grease trap installations frequently exceed that range. A commercial renovation strategy guide built for Metro Vancouver projects breaks these buckets down further if you’re building your first budget from scratch.
How long does a Vancouver tenant improvement permit take?
For TIPs‑eligible projects, expect an initial review turnaround measured in days, with total permit issuance often landing around two to three weeks for straightforward office fit‑outs. For anything routed through the standard building permit process, retail, restaurant, industrial, or projects in non‑eligible buildings, plan for two to four months from submission to issuance, and longer if your drawings need multiple revision rounds.
Inspections follow a fairly fixed sequence once your permit is issued:
- Rough‑in inspections for framing, electrical, and plumbing before walls close up.
- Field review by your project’s consultants confirming code compliance at key stages.
- Trade inspections tied to your electrical, plumbing, and gas permits.
- Final inspection once all work is substantially complete.
Book inspections as soon as you know your construction schedule, not after the work is done. The City’s inspection queue moves faster when requests come in with lead time, and trying to book a final inspection the week before your lease’s fixturing period ends is a common, avoidable stress point.
Permission to occupy typically follows shortly after your final inspection passes, assuming no outstanding deficiencies remain, and the Vancouver Building Bylaw sets out the Chief Building Official’s authority to issue occupancy permits, including temporary occupancy in specific circumstances.
Pro Tip: Sequence your inspections around your actual construction milestones, not your ideal opening date. Requesting a partial occupancy permit before full sign‑off is possible in some cases, but it should be the exception, not the plan.
What causes permits to get rejected or delayed?
Most rejections trace back to a handful of recurring problems, and none of them are mysterious once you’ve seen a few dozen applications go through review.
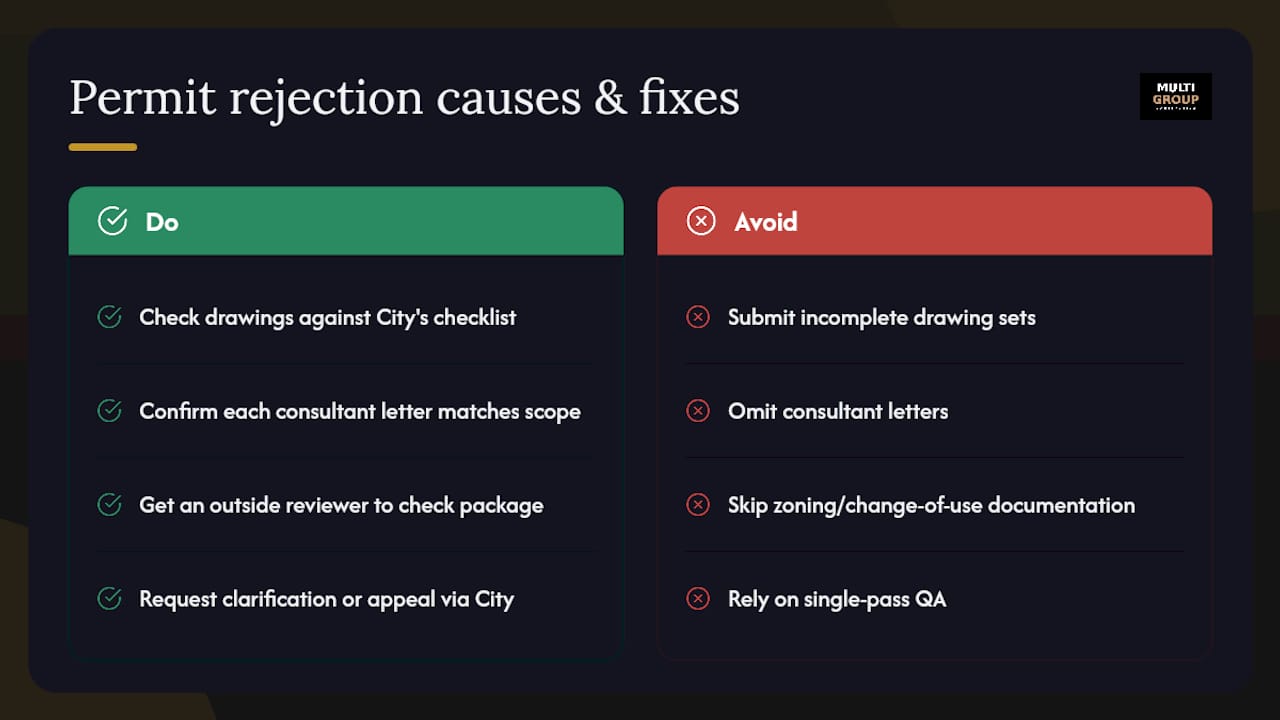
Incomplete drawing sets top the list. Missing dimensions, unclear fire separation details, or mechanical plans that don’t match the architectural layout all trigger review comments that add weeks to your timeline. Missing consultant letters come next, particularly on projects involving structural changes or fire suppression systems, where the City expects a signed letter of assurance before issuing a permit. Zoning conflicts and unclear change‑of‑use rationale round out the common causes, especially when a tenant is converting a space from one use classification to another without clearly documenting how the new use complies with zoning.
Experienced permit coordinators consistently point to the same pattern: applications that fail on the first pass rarely fail because of one big mistake. They fail because several small omissions, a missing dimension here, an unsigned consultant letter there, stack up into a package the reviewer can’t approve without asking questions.
Quality‑checking your submission before filing means walking through your drawing set against the City’s own checklist line by line, confirming every consultant letter matches your actual scope, and having someone outside your design team review the package with fresh eyes.
If a permit is refused outright, or issued with conditions you disagree with, the City provides avenues to request clarification or appeal specific decisions through the Development and Building Services department. For anything beyond a straightforward clarification request, particularly disputes involving zoning interpretation or code variance requests, it’s worth consulting the City directly or a qualified permit expediter or legal counsel familiar with Vancouver’s building bylaw before escalating.
When do you need an architect, engineer, or licensed contractor?
Not every tenant improvement needs a full consultant team, but certain triggers make professional involvement close to mandatory. Structural changes, anything involving load‑bearing walls or new floor openings, almost always require a structural engineer’s sign‑off. Complex mechanical work, particularly commercial kitchen exhaust systems or fire suppression modifications, typically needs a mechanical engineer or fire protection consultant. Any change of occupancy classification, converting retail to restaurant or office to clinic, usually triggers a broader code review that benefits from an architect’s involvement from the start.
Before hiring a designer or contractor, ask a few pointed questions:
- How many Vancouver tenant improvement permits have they submitted in the past two years?
- Can they walk you through their typical submission‑to‑issuance timeline?
- Who handles the actual City liaison, are they available for review comment responses?
- What’s included in their fee: drawings only, or full permit coordination?
Licensing matters more than most first‑time tenants realize. A licensed contractor in BC carries the insurance and WorkSafeBC compliance that protects you if something goes wrong mid‑build, and they’re typically the ones pulling trade permits and coordinating inspection sequencing on your behalf. Confirm licensing status and current WorkSafeBC clearance before signing any construction contract.
How Multigroup Contracting streamlines the permit process
On one recent Metro Vancouver office fit‑out, the biggest time sink wasn’t the construction itself, it was getting the mechanical drawings to match what the electrical consultant had specified before the City would sign off on field review. That kind of coordination gap is common, and it’s exactly where an experienced general contractor earns their fee before a single wall goes up.
A contractor who’s run dozens of Vancouver tenant improvement projects handles several tasks that directly reduce permit risk:
- Coordinating architectural, mechanical, and electrical drawings so they match before submission.
- Managing consultant relationships and collecting the letters the City requires.
- Preparing and submitting the actual permit application through Van311 or the online portal.
- Supporting field review and responding to City comments quickly.
- Pulling trade permits for electrical, plumbing, and gas work.
- Booking and sequencing inspections to match the construction schedule.
Contact a contractor early when your project involves a change of occupancy, structural work, or a commercial kitchen buildout, situations where a coordination misstep between consultants can add months to your timeline. For simpler cosmetic upgrades in a TIPs‑eligible building, you may not need that level of support. For anything touching walls, plumbing, gas, or occupancy classification, it’s worth the conversation before you finalize a lease commencement date. A closer look at how contractors handle permits in Metro Vancouver shows the coordination work in more detail.
A contractor’s view on Vancouver’s most common permit pitfalls
The pattern that shows up most often on Vancouver TI projects isn’t a bad design or a stubborn reviewer. It’s tenants who lock in a lease commencement date before confirming whether their building qualifies for TIPs, then discover midway through design that they’re actually on the standard track with a two to four month timeline instead of a three week one. That single misunderstanding cascades into rushed drawings, incomplete consultant letters, and a permit application that gets bounced back for clarification just when the tenant’s rent‑free period is running out.
If there’s one thing worth prioritizing above everything else in this guide, it’s confirming your permit stream before you sign anything with a landlord that assumes a fast timeline.
Get help with your tenant improvement permit in Metro Vancouver
Multigroup is the alternative to managing permit coordination yourself while also running your business, we handle the drawing coordination, consultant scheduling, and City submissions so you’re not the one chasing down a missing life‑safety letter three weeks before your lease deadline.

As a licensed general contractor serving Metro Vancouver, including Burnaby, Richmond, Surrey, Coquitlam, North Vancouver, West Vancouver, New Westminster, Langley, and Delta, Multigroup Contracting manages tenant improvements, retail buildouts, restaurant and coffee shop renovations, office renovations, warehouse renovations, and leasehold improvements from permit application through final inspection. Every project is scoped for BC Building Code compliance, and our team handles trade permit acquisition and inspection booking as part of full project management, not as an afterthought billed separately. This is a paid contracting service, and we’re upfront about that from the first conversation.
If you’re planning a tenant improvement and want a realistic read on your permit timeline before you commit to a lease date, our tenant improvement guide covers the operational side in more depth, or you can request a permit review and project quote directly through Multigroup.
Sources
Permit rules, fees, and eligibility lists change, and relying on a secondhand summary instead of the primary source is one of the fastest ways to end up with an outdated budget or timeline assumption. Before you submit anything, cross‑check your plan against these official resources.
- Tenant Improvement Program (TIPs) | City of Vancouver
This article is general information, not a substitute for advice from a qualified lawyer. Consult a qualified legal professional about your own circumstances before acting on anything here.
FAQ
What happens if you renovate without a permit in BC?
The City can issue a stop‑work order, require you to remove or expose completed work for inspection, and levy fines, and unpermitted work often surfaces later during a lease renewal, sale, or insurance claim, creating costly retroactive problems.
How much does it cost to get a building permit in Vancouver?
Fees are calculated per 100 square metres of affected floor area under the City’s fee schedule, with maximum caps built in, plus separate charges for revisions, minor amendments, and trade permits. Always confirm current rates with the City before budgeting.
Can I get a retroactive permit in Vancouver?
In some cases the City allows an after‑the‑fact permit application for completed work, but it typically requires exposing finished walls or ceilings for inspection and carries no guarantee of approval, which usually costs more than getting the permit before construction started.
How long does it take to get a building permit in Vancouver?
TIPs‑eligible office fit‑outs often see issuance in roughly two to three weeks, while standard building permits for retail, restaurant, industrial, or ineligible buildings typically take two to four months.
Does painting or new flooring require a permit in Vancouver?
Cosmetic work like painting or flooring generally doesn’t require a permit, but it’s worth confirming with Van311 if your project sits close to the line between cosmetic and structural or life‑safety work.
Who can help manage my tenant improvement permit application?
A licensed general contractor experienced in Vancouver tenant improvements, such as Multigroup Contracting, can coordinate your drawings, consultant letters, City submission, and inspection scheduling from start to finish.